Saturday, 20 May 2017

Managing Domain Name Servers

 What Is A Domain Name Server (DNS) And How Does It Work

Domain Name System is an Internet service that translates domain names into IP addresses and IP addresses into domain names.This is necessary because, although domain names are easy for people to remember, computers or machines, access websites based on IP addresses. Every time you use a domain name, therefore, a DNS service must translate the name into the corresponding IP address. For example, the domain name www.satyam.com might translate to 120.0.0.20.

DNS Zone Types


Forward Lookup Zones:

The most common zone of DNS is forward lookup zone. its main work to converts host name into IP address.  In windows server 2008 you can divide your zone into three regions that are primary, secondary and stub.

How to create Forward lookup primary DNS zone in server 2008


Step1 First you would give an IP on going to "ncpa.cpl" there you right click on Local Area Connection and going ther properties then you give an IP. sapoose I am take an IP i.e. 120.0.0.20


Step2 Go to server manager and select ROLES and after that ADD ROLES then click on DNS and install that


Step3 Click on start button then Administrative tool and then DNS


Step4 Here you expend the computer name, Right click on Forward Lookup zone and select new zone After that New zone wizard is open infront of you. here I take an example like "Satyam.com" and after that click next


Step5 here you select Allow both nonsecure and secure


 And click Next and at last you select Finish.

Step6 After that you expend Forward lookup zone, Right click on Hsos name and select New Host ( A or AAA ).... and after opening wizard infront of you, you will type only "www" in name box and select Add Host


How to create Reverse lookup zone in server 2008

Reverse lookup zone allows the client to get the name of the corresponding IP address by querying, in reverse lookup zone we can create the PTR (Pointer) again any host.
Step1 Creating reverse zone in active directory is almost same as forward lookup zone. Right click on reverse zone in DNS console and click on new zone. 

Here you fill Network ID and after clicking next select Allow both nonsecure and secure and at last select Finish

Step2 expend reverse lookup zone, right click on IP and select "New Pointer ( PTR ). After open wizard you are fill the host name in my case i.e. "www.satyam.com" and select "ok"


TO CHECK THAT YOU ARE MADECURRECTLY OR NOT 

Step1 GO on "cmd" and type command "nslookup 120.0.0.20 (your IP)"


After that you can see that by typing your IP your Host Name is aaper infront of you


Friday, 19 May 2017

What is Subnet Mask and What is Subnetting ? ( Part 2 )

Before starting this tutorials I will suggest you that please read the " What is subnet Mask and What is Subnetting ? ( Part 1 )
So lets start .....

Prefix Notation

A subnet mask is written in the decimal or 32 bit binary number form. Prefix is an alternative represent the mask. Table 1 lists the default subnet masks using the network prefix notation for the subnet mask.

Address Class                            Bits for Subnet Mask                      Network Prefix
Class A                 11111111 00000000 00000000 00000000                /8
Class B                 11111111 11111111 00000000 00000000                 /16
Class C                 11111111 11111111 11111111 00000000                  /24

For example, the class B network ID 138.96.0.0 with the subnet mask of 255.255.0.0 would be expressed in network prefix notation as 138.96.0.0/16.
Here 1 is known as Network bits or on bits
and  0 is known as Host bits or off bits.

The individual subnets and hosts can be determined through two basic formulas.
  • Number of subnets = 2n where n is the number of bits borrowed to make the subnet mask or Number of borrowed on bits.
  • Number of host per subnet =   2x-2
  • Number of Bock size = 256 - New subnet 


So here I am taking an example 
sappose I take a 10.0.0.1 and prefix is /11

Solution    
10.0.0.1   subnet prefix - /11
Then, Default subnet mask = 255.0.0.0
In subnet prefix notation = 255.11100000.0.0
Then Number of subnets = 2n  _23 =8
Number of Bock size = 256 -
Number of host per subnet =   2x-2 =  2power 5 -2 =30
Number of Bock size = 256 -224 (as given in table which is in part 1)
=32
So I make a table
Block size   0   32   64   96  128  160  192   224
First IP       1   33    65   97   129  161  193  225
                   .     .       .     .       .         .     .       .
                   .     .       .     .       .         .     .       .
                   .     .       .     .       .         .     .       .
Last IP        30  62   94   126  158   190 222  254
Block IP      31  63   95   127   159   191 223  255    

What is Subnet Mask and What is Subneting ? ( Part 1 )

Definition - What does Subnet Mask mean?

A subnet mask is a 32-bit number used to differentiate the network component of an IP address by dividing the IP address into a network address and host address.
The default subnet mask:
  • Class A: 255.0.0.0
  • Class B: 255.255.0.0
  • Class C: 255.255.255.0

What is Subneting? Explain the default subnet mask is as follows:he advantages of using Subneting.

Subneting is a process of breaking the network into smaller units. These units care called as subnets.By using subnetting, one single Class IP address can be used to have smaller sub-networks which provides better network management capabilities.
This is usually done for the following purposes:
a. Reducing network traffic by decreasing the number of broadcasts
b. Exceeding the limitations in a local area network
c. Enabling people to connect to the network remotely without opening the entire network


Advantages of using Subneting:-
a. Easier network management and trouble shooting
b. Routing table’s size is reduced which means faster network transfers
c. Solves network congestion problems:- Since the complete network is divided into smaller networks
d. Network addresses can be decentralized e.g. the administrator of the network can monitor the subnet.


Class A Subnets

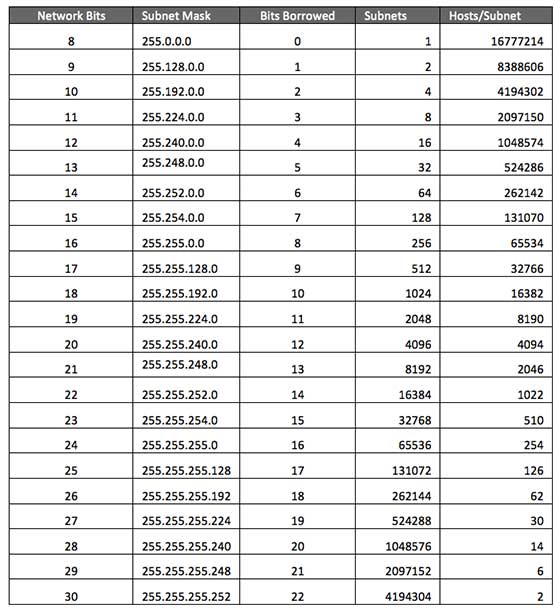
In Class A, only the first octet is used as Network identifier and rest of three octets are used to be assigned to Hosts (i.e. 16777214 Hosts per Network).
The Subnet mask is changed accordingly to reflect subnetting. Given below is a list of all possible combination of Class A subnets:

Class A Subnets

In case of subnetting too, the very first and last IP address of every subnet is used for Subnet Number and Subnet Broadcast IP address respectively. Because these two IP addresses cannot be assigned to hosts, sub-netting cannot be implemented by using more than 30 bits as Network Bits, which provides less than two hosts per subnet.

Class B Subnets

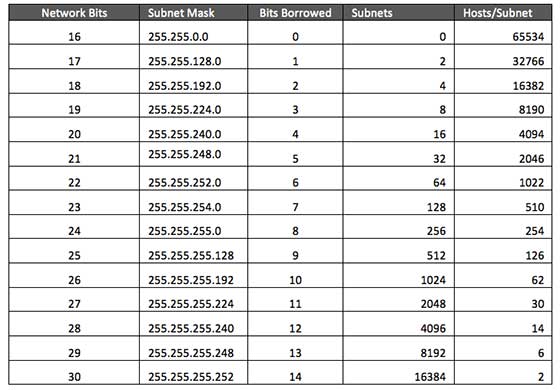
By default, using Classful Networking, 14 bits are used as Network bits providing (214) 16384 Networks and (216-2) 65534 Hosts. Class B IP Addresses can be subnetted the same way as Class A addresses.  Below is given all possible combination of Class B subnetting:

Class B Subnets

Class C Subnets

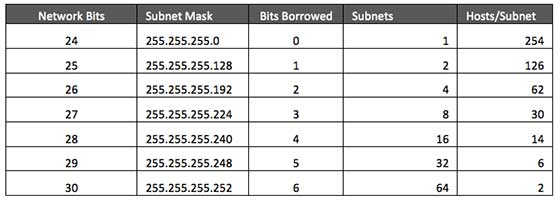
Class C IP addresses are normally assigned to a very small size network because it can only have 254 hosts in a network. Given below is a list of all possible combination of subnetted Class B IP address:

Class C Subnets

Wednesday, 17 May 2017

How To: 4 Ways to Crack a Facebook Password & How to Protect Yourself from Them

4 Ways to Crack a Facebook Password & How to Protect Yourself from Them


In this article I'll show you these, and a couple other ways that hackers (and even regular folks) can hack into someone's Facebook account. But don't worry, I'll also show you how to prevent it from happening to you.

Method 1: Reset the Password

The easiest way to "hack" into someone's Facebook is through resetting the password. This could be easier done by people who are friends with the person they're trying to hack.
  • The first step would be to get your friend's Facebook email login. If you don't already know it, try looking on their Facebook page in the Contact Info section.
  • Next, click on Forgotten your password? and type in the victim's email. Their account should come up. Click This is my account.
  • It will ask if you would like to reset the password via the victim's emails. This doesn't help, so press No longer have access to these?
  • It will now ask How can we reach you? Type in an email that you have that also isn't linked to any other Facebook account.
  • It will now ask you a question. If you're close friends with the victim, that's great. If you don't know too much about them, make an educated guess. If you figure it out, you can change the password. Now you have to wait 24 hours to login to their account.
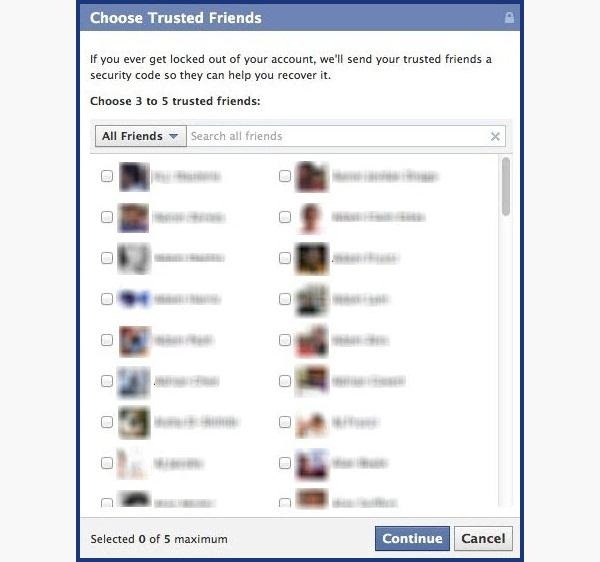
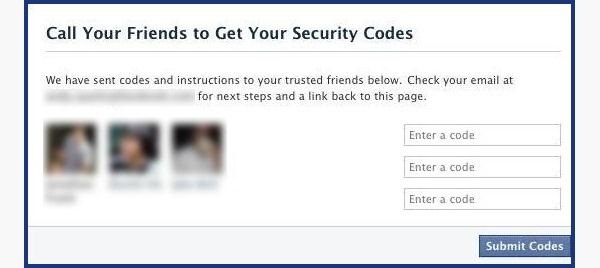
  • If you don't figure out the question, you can click on Recover your account with help from friends. This allows you to choose between three and five friends.

  • It will send them passwords, which you may ask them for, and then type into the next page. You can either create three to five fake Facebook accounts and add your friend (especially if they just add anyone), or you can choose three to five close friends of yours that would be willing to give you the password.

    How to Protect Yourself

    • Use an email address specifically for your Facebook and don't put that email address on your profile.
    • When choosing a security question and answer, make it difficult. Make it so that no one can figure it out by simply going through your Facebook. No pet names, no anniversaries—not even third grade teacher's names. It's as easy as looking through a yearbook.
    • Learn about recovering your account from friends. You can select the three friends you want the password sent to. That way you can protect yourself from a friend and other mutual friends ganging up on you to get into your account.

    Method 2: Use a Keylogger

    Software Keylogger
    A software keylogger is a program that can record each stroke on the keyboard that the user makes, most often without their knowledge. The software has to be downloaded manually on the victim's computer. It will automatically start capturing keystrokes as soon as the computer is turned on and remain undetected in the background. The software can be programmed to send you a summary of all the keystrokes via email.
    CNET has Free Keylogger, which as the title suggests, is free. If this isn't what you're looking for, you can search for other free keyloggers or pay for one.
  • These work the same way as the software keylogger, except that a USB drive with the software needs to be connected to the victim's computer. The USB drive will save a summary of the keystrokes, so it's as simple as plugging it to your own computer and extracting the data. You can look through Keelog for prices, but it's bit higher than buying the software since you have the buy the USB drive with the program already on it

    How to Protect Yourself

    • Use a firewall. Keyloggers usually send information through the internet, so a firewall will monitor your computer's online activity and sniff out anything suspicious.
    • Install a password manager. Keyloggers can't steal what you don't type. Password mangers automatically fill out important forms without you having to type anything in.
    • Update your software. Once a company knows of any exploits in their software, they work on an update. Stay behind and you could be susceptible.
    • Change passwords. If you still don't feel protected, you can change your password bi-weekly. It may seem drastic, but it renders any information a hacker stole useless.

    Method 3: Phishing

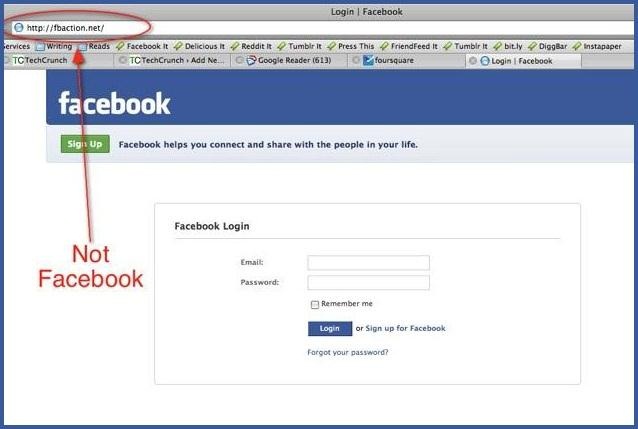
    This option is much more difficult than the rest, but it is also the most common method to hack someone's account. The most popular type of phishing involvescreating a fake login page. The page can be sent via email to your victim and will look exactly like the Facebook login page. If the victim logs in, the information will be sent to you instead of to Facebook. This process is difficult because you will need to create a web hosting account and a fake login page. The easiest way to do this would be to follow our guide on how to clone a website to make an exact copy of the facebook login page. Then you'll just need to tweak the submit form to copy / store / email the login details a victim enters. If you need help with the exact steps, there are detailed instructions available by Satyam Singh here on this tutorials. Users are very careful now with logging into Facebook through other links, though, and email phishing filters are getting better every day, so that only adds to this already difficult process. But, it's still possible, especially if you clone the entire Facebook website.

    How to Protect Yourself

    • Don't click on links through email. If an email tells you to login to Facebook through a link, be wary. First check the URL (Here's a great guide on what to look out for). If you're still doubtful, go directly to the main website and login the way you usually do.
    • Phishing isn't only done through email. It can be any link on any website / chat room / text message / etc. Even ads that pop up can be malicious. Don't click on any sketchy looking links that ask for your information.
    • Use anti-virus & web security software, like Norton or McAfee.

    Method 4: Stealing Cookies

    Cookies allow a website to store information on a user's hard drive and later retrieve it. These cookies contain important information used to track a session that a hacker can sniff out and steal if they are on the same Wi-Fi network as the victim. They don't actually get the login passwords, but they can still access the victim's account by cloning the cookies, tricking Facebook into thinking the hacker's browser is already authenticated.

    How to Protect Yourself

    • On Facebook, go to your Account Settings and check under Security. Make sure Secure Browsing is enabled. Firesheep can't sniff out cookies over encrypted connections like HTTPS, so try to steer away from HTTP.
    • Full time SSL. Use Firefox add-ons such as HTTPS-Everywhere or Force-TLS.
    • Log off a website when you're done. Firesheep can't stay logged in to your account if you log off.
    • Use only trustworthy Wi-Fi networks. A hacker can be sitting across from you at Starbucks and looking through your email without you knowing it.
    • Use a VPN. These protect against any sidejacking from the same WiFi network, no matter what website you're on as all your network traffic will be encrypted all the way to your VPN provider.

Tuesday, 16 May 2017

Seven Layers of OSI Model and functions of seven layers of OSI model

International Standards Organization (ISO) proposed the Open Systems Interconnection (OSI) network model. The Open Systems Interconnection (OSI) model breaks down the problems involved in moving data from one computer to another computer.
Open Systems Interconnection (OSI) Seven Layered reference model is only just a reference model. The following image shows the seven layers described in Open Systems Interconnection (OSI) model.

Seven Layers of OSI model

Physical (Layer 1) 

OSI Model, Layer 1 conveys the bit stream - electrical impulse, light or radio signal  through the network at the electrical and mechanical level. It provides the hardware means of sending and receiving data on a carrier, including defining cables, cards and physical aspects. Fast EthernetRS232, and ATM are protocols with physical layer components.
Webopedia Study Guide Section Layer 1 Physical examples include Ethernet, FDDI, B8ZS, V.35, V.24, RJ45, hub Network card.

Data Link (Layer 2)

The data link layer is the secound layer of the osI model. It perform four function:
1) Framing
2) Arbitration
3) Physical Addressing
4) Error detection 
5) Identifying the encapsulated data
When the data link layer accepts the data from the network layer, it adds meaningful bits at the begining and the end of the data. these bits are known as the header and trailer respectively. 
The data link layer is divided into two sub layers: The Media Access Control (MAC) layer and the Logical Link Control (LLC) layer. The MAC sub layer controls how a computer on the network gains access to the data and permission to transmit it. The LLC layer controls frame synchronization, flow control and error checking.
 Webopedia Study Guide Section Layer 2 Data Link examples include PPP, FDDI, ATM, IEEE 802.5/ 802.2, IEEE 802.3/802.2, HDLC, Frame Relay. 

Network (Layer 3)

Layer 3 provides switching and routing technologies, creating logical paths, known as virtual circuits, for transmitting data from node to node. Routing and forwarding are functions of this layer, as well as addressing,internetworking, error handling, congestion control and packet sequencing.
Webopedia Study Guide Section Layer 3 Network examples include AppleTalk DDP, IP, IPX, Router, Switches.

Transport (Layer 4)

OSI Model, Layer 4, provides transparent transfer of data between end systems, or hosts, and is responsible for end-to-end error recovery and flow control. It ensures complete data transfer.
Webopedia Study Guide Section Layer 4 Transport examples include SPX, TCP, UDP.

Session (Layer 5)

This layer establishes, manages and terminates connections between applications. The session layer sets up, coordinates, and terminates conversations, exchanges, and dialogues between the applications at each end. It deals with session and connection coordination.
Webopedia Study Guide Section Layer 5 Session examples include NFS, NetBios names, RPC, SQL.

Presentation (Layer 6)

This layer provides independence from differences in data representation (e.g., encryption) by translating from application to network format, and vice versa. The presentation layer works to transform data into the form that the application layer can accept. This layer formats and encrypts data to be sent across a network, providing freedom from compatibility problems. It is sometimes called the syntax layer.
Webopedia Study Guide Section Layer 6 Presentation examples include encryption, ASCII, EBCDIC, TIFF, GIF, PICT, JPEG, MPEG, MIDI.

Application (Layer 7)

OSI Model, Layer 7, supports application and end-user processes. Communication partners are identified, quality of service is identified, user authentication and privacy are considered, and any constraints on datasyntax are identified. Everything at this layer is application-specific. This layer provides application services forfile transferse-mail, and other network software services. Telnet and FTP are applications that exist entirely in the application level. Tiered application architectures are part of this layer.
Webopedia Study Guide Section Layer 7 Application examples include WWW browsers, NFS, SNMP, Telnet, HTTP, FTP 
DID YOU KNOW....? Two similar projects from the late 1970's were merged in 1983 to form the Basic Reference Model for Open Systems Interconnection standard (the OSI model). It was published in 1984 as standard ISO 7498.

Monday, 15 May 2017

HOW TO BREAK THE WINDOWS 7 PASSWORD

Here I am tell you about , How we can break the microshoft windiws 7 password.

Step 1: Start That PC:

  • Turn on the UPS and the CPU, tap F8 continuously on the boot screen to get some windows start-up options .
  • Choose "Start windows normally" option and turn the UPS off immediately.
  • Then turn on the PC again, let it load.

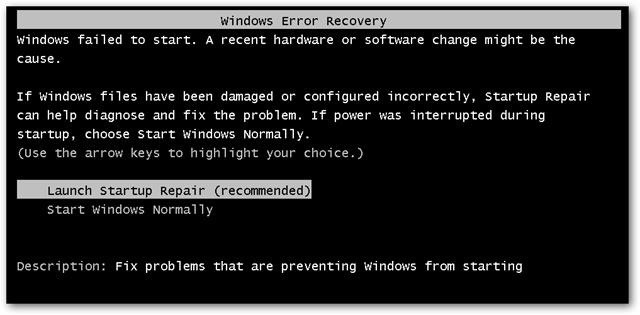
  • After that you will be prompted with two options in the boot screen (again), select the first option - "Launch Start-up Repair(recommended)"

  • Let it load and Scan for issues.
  • After 5 min, It will ask you to "restore defaults", select "Cancel" option.
  • Lets continiue......
  • Step 2:Wait for About 15-20 Minutes:

    Now this is where the tricky part comes:
    • After 20 min, an error report screen will pop-up, asking to send information or not.
    • Ignore it, click on "View Problem Details" arrow, scroll down to the end of the report, then click a link stating X:\windows\ something...something (the link starts with an"X")
    • Another Window will pop-up, and will look like a notepad (it is a notepad)
    • Click File on the Menu-Bar, then select Open, and another window will pop-up (that's just too many windows!)
    • Navigate to C: drive (or whatever drive on which windows is installed), click Windows, then System32, after that click on the arrow beside the "File Type" option and select "all files"
    • Then search for a file named "sethc"(this is the shortcut to stickey keys), rename it to something else (Eg:abc)
    • Search for cmd, make its copy and rename the copy as "sethc"
    • --------------------------------------ITS DONE!!!---------------------------------------------
      (Almost)
      • Close everything, restart the PC, go to the log-in screen, press shift 5 times, until a cmd (command prompt) pops-up.
      • Type in "net user administrator /active:yes", and this will activate the default administrator account of the PC.
      • Change/delete/manage/reset passwords from there.
      • Or you can directly change passwords from cmd, type "net user (admin/any admin account's name) and then after a space put an asterix.
      • ---------------------------------------HACKED------------------------------------------------

        Step 3: 

        The End:

SOME BASIC QUESTION ABOUT COMPUTER FUNDAMENTAL

  1)    What is microprocessor and how to identify microprocessor? Ans - Microprocessor is an integrated circuit that contain all the fu...